Stop accepting that lackluster, dimly lit bathroom. It is a common frustration: walking into a small bathroom only to be greeted by a single, harsh light bulb casting unflattering shadows. When you deal with a compact space, poor illumination instantly makes the room feel cramped, dated, and simply uninviting.
The secret to maximizing any small bathroom lies not in tearing down walls, but in strategically upgrading your bathroom lighting fixes. Thoughtful lighting is the quickest, most effective way to infuse a boring space with style, warmth, and the illusion of greater size. Good lighting turns a small room into a sophisticated retreat.

We have gathered 41 stunning and clever ways to banish those shadows forever. Whether you are a homeowner ready for a full renovation or a renter looking for a simple plug-in upgrade, this guide features brilliant solutions for every budget and skill level. It is time to brighten your small space with personality and polish.
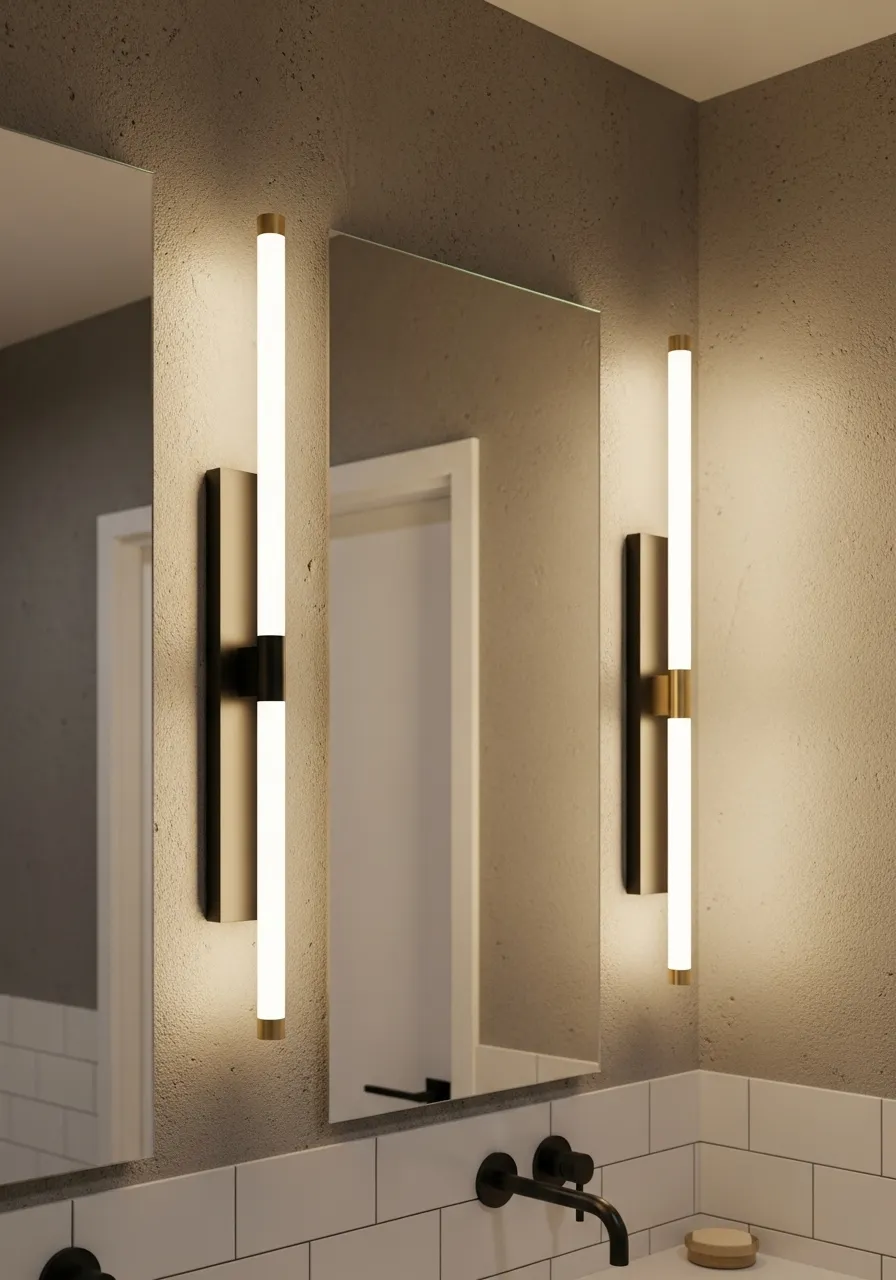
1. ✨ Sleek Dual-Bar Vanity Light Sconces
Product Name: Modern Vertical LED Vanity Wands

These striking vertical fixtures are an amazing bathroom lighting fix for any small space. They flank the mirror beautifully, offering a powerful yet diffused light that banishes shadows. Notice the stunning contrast created by the matte black and brass accents; this adds a luxurious, high-end feel without cluttering the wall.
Unlike typical overhead lights, placing the light source on both sides of the mirror provides even illumination, essential for makeup application and grooming. The slender, linear design takes up minimal horizontal space, making them particularly well-suited for narrow walls in compact bathrooms. This contemporary style easily updates a dated washroom. Upgrading your lighting is one of the quickest ways to elevate your entire bathroom’s aesthetic.
Required Materials List
- Two (2) Vertical LED Vanity Wands (Rated for damp locations).
- Mounting hardware (usually included with the fixture).
- Non-contact voltage tester.
- Phillips and flathead screwdrivers.
- Wire strippers/cutters.
- Electrical tape.
- Stepladder (ensure it is stable and rated for your weight).
- Safety glasses and work gloves.
- Pencil and level.
DIY Installation Instructions (Replacing Existing Fixtures)
Safety First: Always turn off the power to the light switch and the entire circuit at your main breaker panel before touching any wires. Post a note on the breaker panel so no one accidentally turns it back on.
- Remove the Old Fixture: Carefully unscrew and detach the existing vanity light. Before disconnecting the wires, use your non-contact voltage tester to ensure the power is truly off. Once confirmed, carefully disconnect the three sets of wires (Black/Hot, White/Neutral, and Green or Bare Copper/Ground).
- Prepare the Mounting Plate: Take the new fixture’s mounting plate and secure it to the existing electrical junction box in the wall using the provided screws. Use a level to ensure the plate is perfectly straight before fully tightening it.
- Position and Mark: Hold the new light fixture up to the mounting plate. Use a pencil to mark where the center of the second fixture will go on the opposite side of the mirror. Ensure the two fixtures are horizontally level with each other and symmetrically spaced from the mirror’s edges. Repeat steps 1 and 2 for the second fixture.
- Wire the New Fixture: Take one new fixture and connect the wires. Twist the wires together securely using wire nuts:
- Black fixture wire to the Black (Hot) wire from the wall.
- White fixture wire to the White (Neutral) wire from the wall.
- Ground wire (Green or Bare Copper) from the fixture to the Ground wire from the wall or the metal junction box.
- Tug gently on the wire nuts to confirm the connections are secure. Wrap electrical tape around the wire nuts and connections for an extra layer of safety.
- Mount the Fixture: Gently tuck the connected wires into the junction box. Align the fixture’s base with the mounting plate and secure it with the provided screws or fasteners.
- Test and Complete: Repeat steps 4 and 5 for the second light fixture. Once both are securely installed, clean up your tools, and step back from the breaker panel. Flip the power back on, and test your bright, new bathroom lights!
2. ???? Minimalist LED Bar Over the Mirror
Product Name: Contemporary Slim Line Chrome LED Vanity Bar

This modern fixture presents an incredibly streamlined bathroom lighting fix for any small space. Its sleek, horizontal design sits beautifully atop the mirror, providing clean, non-obtrusive illumination. The chrome finish complements the existing marble countertop and traditional gold-framed mirror, demonstrating how modern light can pair perfectly with classic aesthetics.
Using a single, continuous light source avoids the harsh spots and uneven brightness often associated with multi-bulb strip lights. This creates a wall wash of light that is both flattering and highly functional for small bathrooms. The fixture is energy-efficient due to its integrated LED technology, meaning you won’t need to change bulbs often, saving time and money. Installing an updated light bar like this instantly makes a bathroom feel more current and spacious.
Required Materials List
- One (1) Slim Line LED Vanity Bar (Damp-rated).
- Mounting bracket and screws (included).
- Non-contact voltage tester.
- Phillips and flathead screwdrivers.
- Wire strippers/cutters and electrical tape.
- Stepladder.
- Safety glasses and work gloves.
DIY Installation Instructions (Replacing an Old Fixture)
- Prioritize Safety: Shut off the power to the light switch and the entire circuit at your main breaker panel. Verify the power is off using your non-contact voltage tester before touching any wires.
- Remove the Existing Light: Carefully take down the current vanity light. Disconnect the house wiring (Black/Hot, White/Neutral, Ground) from the old fixture.
- Attach the Mounting Bracket: Affix the new light bar’s mounting bracket to the electrical junction box in the wall. You must ensure the bracket is centered over the mirror and perfectly level using a level tool.
- Connect the Wires: Hold the new light fixture near the wall. Connect the wires from the new light to the house wires using wire nuts:
- Black to Black.
- White to White.
- Ground to Ground (or to the ground screw on the mounting bracket).
- Double-check that all connections are tight. Gently push the wires back into the junction box.
- Mount the New Fixture: Secure the body of the LED light bar to the mounting bracket using the provided screws or fasteners. Make sure it is flush against the wall.
- Restore Power: Clean up your workspace and put away your tools. Head back to the breaker box, turn the power on, and test your bright, clean illumination.
3. ???? Layered “Hollywood” Glam Lighting
Product Name: Mixed-Style Layered Vanity Lighting System

Why choose just one style when you can have two amazing bathroom lighting fixes in one spot? This vanity combines a classic six-bulb strip light on top with modern vertical LED tubes on the sides. This powerful combination delivers comprehensive, museum-quality lighting, completely eliminating all facial shadows. The polished chrome finish ties the entire look together, adding a reflective brightness that makes a small room feel larger.
The overhead strip provides general, high-wattage ambient light, while the vertical tubes offer crucial, direct illumination from the sides for grooming. Using frosted or globe bulbs on the top fixture softens the light, preventing glare while still maximizing output. This layered approach is a stunning solution for a vanity area where clarity and accuracy are vital. It provides a luxurious, retro-glam feel while maintaining complete functionality.
Required Materials List
- One (1) Horizontal 6-Light Vanity Strip Fixture (Damp-rated).
- Two (2) Vertical LED Sconces (Damp-rated).
- Six (6) Globe-style light bulbs (for the strip light).
- Mounting hardware (included with fixtures).
- Non-contact voltage tester.
- Phillips and flathead screwdrivers.
- Wire strippers/cutters and electrical tape.
- Stepladder.
- Safety glasses and work gloves.
DIY Installation Instructions (Installing Layered Lighting)
- Confirm Power is Off: Deactivate the circuit at the breaker box and use a voltage tester on all existing wiring to confirm zero power. You must ensure the power is off before handling any exposed wires.
- Mount the Horizontal Strip: Install the mounting bracket for the top strip light onto the central junction box above the mirror.
- Determine Sconce Placement: Using a pencil and a measuring tape, mark the location for the two side sconces. They should be vertically centered with the mirror’s face and equidistant from its edges. Crucially, ensure you can run new wiring to these spots. This step may require opening a section of the wall if there is no existing electrical box. If new boxes are needed, strongly consider hiring an electrician.
- Wire and Mount Top Light: Wire the top strip light to the existing junction box (Black to Black, White to White, Ground to Ground). Secure the fixture body to its mounting bracket.
- Wire and Mount Side Sconces: For the vertical sconces, carefully pull the new or existing wires through the electrical boxes at the marked side locations. Connect their wiring to the house wiring using wire nuts. Secure their mounting brackets and then the fixture bodies to the wall.
- Install Bulbs and Test: Screw the six globe bulbs into the top fixture. Clean up the area. Turn the power back on at the breaker box and test all three lights.
4. ⚙️ Industrial Articulating Sconce
Product Name: Matte Black Adjustable Swing Arm Wall Sconce (Plug-In)

This industrial-style sconce is a brilliant and flexible bathroom lighting fix, especially for renters or those who want to avoid major wiring. The matte black finish and adjustable arm offer a chic, edgy look that contrasts wonderfully with a simple mirror. Since this model is plug-in, installation is incredibly simple, requiring no electrical work behind the wall.
The swing arm design allows you to move the light exactly where you need it, which is useful for focused task lighting during detailed grooming. When not in use, the arm can fold neatly against the wall, preserving valuable space in a smaller room. This type of light fixture adds personality and depth, proving that functional pieces can also be highly decorative elements. Remember to use a moisture-rated bulb since it’s in a bathroom environment.
Required Materials List
- One (1) Plug-In Swing Arm Sconce (Damp-rated).
- Mounting plate/bracket (included).
- Appropriate screws and drywall anchors (included).
- Pencil and level.
- Drill and drill bits.
- Phillips screwdriver.
- Optional: Cord covers/raceways (to hide the visible cord).
DIY Installation Instructions (Plug-In Model)
- Mark the Location: Choose the desired location for the sconce base, typically to one side of the mirror and at eye level. Hold the mounting plate against the wall and use a level to ensure it is straight. Use a pencil to mark where the center of the screw holes.
- Drill and Anchor: Set the mounting plate aside. Use your drill to create pilot holes at the marked spots. Gently tap the provided drywall anchors into the holes until they sit flush with the wall surface. If you hit a wall stud, you can skip the anchor.
- Secure the Mounting Plate: Align the mounting plate with the anchors. Use the provided screws and your screwdriver to securely attach the plate to the wall. It must be very firmly secured to support the weight and movement of the swing arm.
- Attach the Sconce: Carefully line up the light fixture’s base with the mounting plate. Use the provided screws (often tiny set screws on the side) to lock the sconce in place on the plate.
- Plug In and Adjust: Screw in your light bulb. Plug the cord into the nearest wall outlet. Adjust the swing arm to find the illumination angle that best suits your needs.
- Optional Cord Management: For a cleaner look, use plastic cord covers or raceways (available at hardware stores) to neatly conceal the cord run from the sconce base to the outlet.
5. ???? LED Backlit Capsule Mirror
Product Name: Vertical Illuminated LED Capsule Mirror with Touch Control

This fixture is the ultimate modern bathroom lighting fix, combining a mirror and ambient light source into one streamlined unit. The elongated, rounded capsule shape is a stylish choice that maximizes vertical space, making a small bathroom ceiling feel taller. This design is clean, frameless, and highly contemporary.
The mirror features subtle, user-friendly touch controls at the bottom, allowing for easy adjustment of brightness or color temperature (cool white for task, warm white for relaxing). The soft, glowing halo around the edge provides beautiful, shadow-free illumination that creates a luxurious ambiance. This fixture works as both a primary light and a stunning piece of wall decor. Integrating the light into the mirror itself reduces visual clutter, which is a significant benefit in compact spaces.
Required Materials List
- One (1) Illuminated LED Capsule Mirror (Damp-rated, hardwired model).
- Mounting bracket/hardware (included).
- Non-contact voltage tester.
- Phillips screwdriver.
- Wire strippers/cutters and electrical tape.
- Drill and drill bits.
- Level and measuring tape.
- Safety glasses and work gloves.
- Two people (recommended for lifting and hanging).
DIY Installation Instructions (Hardwired Model)
- Shut Down the Power: Turn off the electricity to the light switch and the entire circuit at the main breaker panel before touching any wires. Verify the power is off using your non-contact voltage tester before proceeding to handle any wires.
- Remove Existing Mirror/Fixture: Carefully remove the old light fixture and any existing mirror to clear the wall space.
- Mount the Bracket: The LED mirror will come with a special hanging bracket. Locate the electrical junction box. Position the bracket so that the mirror will be centered over the sink, marking the screw points on the wall. Use a level to ensure the bracket is perfectly straight. Drill holes and secure the bracket to the wall (using anchors if not drilling into a wall stud).
- Prepare the Wiring: Pull the house wiring (Black, White, Ground) out of the junction box opening. Most LED mirrors have a small wire port on the back.
- Connect the Wires: With a helper holding the mirror, connect the mirror’s internal wiring to the house wiring using wire nuts:
- Black (Hot) to Black.
- White (Neutral) to White.
- Ground wire (Green or Bare Copper) from the mirror to the Ground wire from the wall or the metal junction box.
- Ensure the wires are neatly tucked into the junction box.
- Hang the Mirror: Very carefully, with the help of a partner, lift the mirror and set the mounting hooks on the back onto the secured wall bracket. Confirm the mirror is stable and flush against the wall.
- Test the Light: Restore power at the breaker panel. Test the touch controls on the mirror to ensure the light and any other features (like the defogger, if applicable) are working correctly.
6. ???? Elegant Globe Sconce with Brass Accent
Product Name: Mid-Century Modern Orb Wall Sconce

This beautiful fixture adds a soft, ambient glow, creating a truly relaxing atmosphere. The design is simple yet sophisticated, featuring a striking brass finish stem that holds a luminous white globe. This type of light acts as a piece of jewelry for your walls, bringing a mid-century modern flair to the room.
Placing two of these sconces on either side of a mirror ensures you have cross-illumination, which is a major bathroom lighting fix. The opaque white glass diffuses the light source evenly, minimizing harsh glare and shadows on your face. Because the globe bulb is often smaller than standard fixtures, it works especially well in narrow spaces where larger lights might feel overwhelming. Using warm-toned bulbs enhances the cozy and inviting feel of your small bathroom.
Required Materials List
- One (1) or Two (2) Orb Wall Sconces (Damp-rated).
- Mounting plate and screws (included).
- One (1) or Two (2) G9 or E26 Base LED Bulbs (check fixture specification).
- Non-contact voltage tester.
- Phillips screwdriver.
- Wire strippers/cutters and electrical tape.
- Stepladder.
- Safety glasses and work gloves.
DIY Installation Instructions (Standard Wall Sconce)
- Deactivate the Power: Always cut the electricity to the junction box at the main breaker panel before attempting any electrical work. Confirm zero power using a non-contact voltage tester right inside the existing junction box.
- Remove the Old Fixture: If replacing an older light, unscrew the cover plate and disconnect the three wires (Black, White, and Ground) from the old fixture. Carefully put the old unit aside.
- Attach the Mounting Plate: Secure the new mounting plate (often a round crossbar) to the existing junction box using the provided screws. Use a level to confirm the plate is perfectly straight.
- Connect the Wires: Hold the new sconce near the wall and connect the wires:
- Black wire from the sconce to the Black wire from the wall.
- White wire from the sconce to the White wire from the wall.
- Ground wire (bare copper or green) to the Ground wire from the wall, or wrap it around the green ground screw on the mounting plate.
- Twist a wire nut onto each connection tightly. Gently push the secured wires back into the junction box.
- Secure the Fixture Body: Attach the body of the new sconce to the mounting plate. This usually involves two small screws or a central screw that holds the base plate flush against the wall.
- Install the Globe: Screw the light bulb into the socket. Carefully attach the glass orb globe, typically by twisting or securing a ring nut around the socket base.
- Test the Light: Turn the power back on at the breaker panel and flip the light switch to see your beautiful new illumination.
7. ???? Framed Perimeter Illuminated Mirror
Product Name: Rectangular LED Light Box Mirror

This impressive mirror unit offers a brilliant bathroom lighting fix that eliminates the need for separate vanity lights entirely. The mirror itself is framed by an internal LED light, casting a crisp, bright glow that shines through the glass. This forward-facing light provides some of the best possible task illumination, making it a great choice for applying cosmetics or shaving.
A second set of LEDs placed behind the frame creates a stunning, warm back-light, giving the illusion that the mirror is floating. This subtle glow highlights the wall texture and adds depth to a compact bathroom, making the space feel more substantial. The simple touch button located near the bottom allows you to easily switch the unit on and off, demonstrating a clean, minimalist approach to design.
Required Materials List
- One (1) Hardwired LED Mirror (Damp-rated).
- Wall mounting hardware and bracket (included).
- Non-contact voltage tester.
- Phillips screwdriver and power drill.
- Wire strippers/cutters, wire nuts, and electrical tape.
- Level and measuring tape.
- Safety glasses and work gloves.
- Two people (absolutely necessary for lifting and precise installation).
DIY Installation Instructions (Hardwired LED Mirror)
- Safety Disconnect: Turn off the electricity to the light switch and the entire circuit at the main breaker panel before touching any wires. Use a voltage tester on all existing wiring to confirm zero power.
- Mark and Secure the Bracket: If an old fixture existed, remove it. Find the center point on the wall above the sink. Hold the new mirror’s mounting bracket up, level it precisely, and mark the screw placement points. Drill pilot holes and secure the large hanging bracket to the wall, using anchors where needed.
- Wire Connection: Have your helper hold the mirror close to the wall. Carefully pull the house wiring (Black, White, Ground) through the mirror’s wire access port. Connect the mirror’s wires to the house wiring using wire nuts: Black to Black, White to White, Ground to Ground. Neatly push the connections back into the wall box or mirror housing.
- Hang the Mirror: Working together, lift the LED mirror and securely attach it to the wall bracket, following the specific locking mechanism detailed in your mirror’s instruction manual. Confirm it is stable, secure, and level before letting go.
- Final Test: Clean up the area. Turn the power back on at the breaker panel. Use the touch button control on the mirror face to verify the lighting functions correctly.
8. ???? Illuminated Medicine Cabinet with Integrated Storage
Product Name: LED Integrated Medicine Cabinet with Outlet

This fixture provides one of the most comprehensive bathroom lighting fixes, combining triple functionality: task lighting, ambient light, and hidden storage. The mirrored cabinet features vertical LED light bars built directly into the doors, delivering strong, shadow-free illumination for the face. Opening the mirrored doors reveals interior shelves with small built-in lighting and a useful electrical outlet.
This solution is exceptionally good for small bathrooms because it replaces a standard mirror, eliminates the need for separate wall lights, and offers storage that keeps clutter off the countertop. Keeping surfaces clear greatly enhances the feeling of space. The integrated lights, dimming control, and internal outlet for electric toothbrushes or shavers make this a high-tech and incredibly practical upgrade.
Required Materials List
- One (1) Hardwired LED Medicine Cabinet (Damp-rated).
- Mounting hardware (screws, wall anchors, included).
- Non-contact voltage tester.
- Phillips screwdriver and power drill.
- Wire strippers/cutters, wire nuts, and electrical tape.
- Level and measuring tape.
- Stud finder.
- Two people (recommended for lifting and hanging).
DIY Installation Instructions (Surface Mount Medicine Cabinet)
- Power Disconnection: Switch off the electricity to the circuit at the breaker box that controls the existing light. Use a voltage tester to ensure the existing wires in the junction box are completely safe to handle.
- Determine Placement: Use the cabinet’s provided template (if available) or measure carefully. Center the cabinet above the sink. Mark the top, bottom, and side placement points, ensuring the cabinet will align with the existing electrical box for wiring. Use the stud finder to locate any studs for extra secure mounting points.
- Prepare the Wall: Drill pilot holes at the marked mounting points. Install wall anchors where you are not drilling directly into a stud.
- Connect Wiring: Have your helper assist you in holding the cabinet near the wall. Feed the house wires through the designated wire access hole in the cabinet back. Connect the wires: Black to Black, White to White, Ground to Ground, securing each connection with a wire nut.
- Mount the Cabinet: Carefully lift the cabinet and align it with the prepared mounting holes. Secure the cabinet to the wall using the provided screws, taking care not to scratch the mirror surfaces.
- Final Setup: Close the doors and check the alignment. Flip the power back on at the breaker. Test the external lights, internal lights, and the built-in outlet to confirm everything works as expected.
9. ???? Vintage Edison Bulb Pendant Light
Product Name: Fluted Glass Edison Bulb Mini Pendant

This charming fixture introduces a touch of vintage character and warmth, providing a stylish bathroom lighting fix above the sink. Dropping a pendant from the ceiling draws the eye upward, which helps to increase the perceived height of a small room. The clear, fluted glass shade allows the decorative Edison bulb to shine, creating a beautiful play of light and shadow on the walls.
Using a warm-colored filament bulb produces a very cozy, soft light that works wonderfully for ambiance. While a single pendant may not be enough for task lighting, pairing it with a light-up mirror or recessed lights provides the layered lighting approach that all small bathrooms need. This light fixture, with its simple black cord and aged brass base, brings a custom, artisanal feel to the space.
Required Materials List
- One (1) Mini Pendant Light (Damp-rated).
- One (1) Decorative Edison-style LED bulb.
- Mounting hardware and canopy (included).
- Non-contact voltage tester.
- Phillips screwdriver.
- Wire strippers/cutters and electrical tape.
- Stepladder.
- Safety glasses and work gloves.
DIY Installation Instructions (Ceiling Pendant)
- Crucial Safety Step: Turn off the power to the existing light switch and the entire circuit at the main breaker panel before touching any wires. Verify the power is off using your non-contact voltage tester.
- Remove Old Fixture: Take down the old ceiling light, disconnecting the three wires (Black, White, Ground) from the house wiring.
- Attach the Mounting Plate: Secure the pendant’s mounting plate (or crossbar) to the ceiling junction box.
- Adjust Cord Length: Before wiring, adjust the length of the pendant cord so the light hangs at the appropriate height. A good rule of thumb for a vanity is to have the bottom of the light about 65 inches to 70 inches from the floor, or high enough not to obstruct the mirror.
- Connect Wires: Once the cord length is set, trim any excess wire, strip the ends, and connect the wires using wire nuts:
- Black to Black.
- White to White.
- Ground to Ground (or to the ground screw on the mounting plate).
- Secure the Canopy: Push the wires neatly into the junction box. Slide the decorative ceiling canopy (the dome covering the wires) up to the ceiling and secure it to the mounting plate with the provided screws or fasteners.
- Install the Bulb: Screw in the decorative Edison LED bulb and attach the glass shade to the fixture base.
- Test the Light: Restore power at the breaker panel. Turn the power back on, and test your bright, new bathroom lights!
10. ⏹️ Square Trim Recessed LED Downlights
Product Name: Minimalist Square Trim LED Recessed Light

Recessed lighting is one of the most essential bathroom lighting fixes for maximizing space on the ceiling. These modern downlights feature a sleek, square trim that offers a more architectural look than traditional round can lights. They sit flush with the ceiling, becoming virtually invisible when off, which is a major advantage in any small room.
Using multiple recessed lights evenly spaced across the ceiling provides general ambient light, eliminating dark corners and making the entire room feel open and bright. The LED technology ensures high energy efficiency and a long lifespan. The light is focused directly downward, providing powerful, concentrated illumination exactly where you need it without creating glare from a visible bulb.
Required Materials List
- Two or more (2+) Recessed LED Downlights (IC-rated, damp-rated).
- Wiring connector box (included with retrofit models).
- Non-contact voltage tester.
- Phillips screwdriver.
- Keyhole saw or drywall saw (for cutting ceiling holes).
- Wire strippers/cutters, wire nuts, and electrical tape.
- Stepladder.
- Safety glasses and work gloves.
DIY Installation Instructions (Retrofit Installation into Existing Ceiling)
- Safety Shutdown: Turn off the power to the existing light switch and the entire circuit at the main breaker panel before touching any wires. Verify with your voltage tester that the power is truly off.
- Mark and Cut Holes: Use the provided template from the light packaging to trace the exact square hole size onto the ceiling where each light will be placed. Ensure the holes are evenly spaced across the ceiling for the best light coverage. Use the keyhole saw to carefully cut out the marked holes.
- Run Wiring: If you are connecting new lights, you will need to run new electrical wire (often Romex) from the existing junction box to the new light locations. (If this involves extensive new wiring runs, consulting an electrician is strongly recommended.)
- Wire the Light: Feed the end of the electrical wire through the knockout hole on the light’s connector box. Open the box and connect the house wires to the light’s wires: Black to Black, White to White, Ground to Ground. Secure these connections with wire nuts. Close the box cover securely.
- Insert and Secure: Push the connected wire box up through the hole into the ceiling cavity. Next, gently push the light fixture itself into the hole. Most LED recessed lights have spring clips or torsion springs that clamp onto the drywall, holding the light firmly and flush against the ceiling surface.
- Test and Complete: Repeat steps 4 and 5 for all lights. Return to the breaker panel, turn the power back on, and enjoy the clean, minimal light distribution.
11. ???? Sputnik Style Ceiling Fixture
Product Name: Mid-Century Brass Spoke Chandelier

Installing a fixture like this is a bold and dramatic bathroom lighting fix that immediately transforms the room’s central focus. This sputnik-style chandelier bursts out from the ceiling, featuring multiple arms tipped with exposed bulbs, all finished in a luxurious warm brass. The sheer number of bulbs guarantees intense, ambient light that washes the whole space, making it feel much larger and brighter.
This eye-catching piece elevates your bathroom from purely utilitarian to genuinely stylish. Using clear Edison-style LED bulbs adds to the vintage-modern aesthetic while maintaining efficiency. Although it is a striking fixture, its overall footprint is contained against the ceiling, making it a viable centerpiece for a smaller room with standard ceiling heights. This chandelier proves that you don’t need a huge room to make a significant design statement.
Required Materials List
- One (1) Sputnik Chandelier (Damp-rated).
- Multiple (12+) decorative LED light bulbs (Edison style or G25 globes).
- Mounting hardware (included).
- Non-contact voltage tester.
- Phillips screwdriver.
- Wire strippers/cutters and electrical tape.
- Stepladder.
- Safety glasses and work gloves.
DIY Installation Instructions (Ceiling Mounted Fixture)
- Strict Safety Compliance: Turn off the electricity to the existing light switch and the entire circuit at your main breaker panel before touching any wires. Test the existing ceiling wires with your non-contact voltage tester to ensure the area is safe to work in.
- Remove the Old Fixture: If an old light exists, unscrew the canopy, disconnect the three wires (Black/Hot, White/Neutral, Ground), and carefully remove the old unit.
- Assemble the Fixture: Some sputnik lights require you to screw the individual spokes onto the central hub. Assemble the body of the chandelier on the ground according to the manufacturer’s instructions.
- Attach the Mounting Plate: Secure the mounting crossbar or plate to the ceiling junction box using the provided screws.
- Connect the Wiring: Have your helper hold the fixture near the ceiling. Connect the wires: Black to Black, White to White, and Ground to Ground (or to the ground screw on the mounting plate). Secure all three connections with wire nuts.
- Secure the Canopy: Gently push the connected wires into the junction box. Align the chandelier’s decorative canopy (the base plate) with the mounting plate and secure it firmly to the ceiling using the provided final screws or nuts.
- Install Bulbs and Test: Screw all the decorative LED bulbs into their sockets. Restore power at the breaker panel and test your new, brilliant light.
12. ⬜ Flush Mount Modern Panel Light
Product Name: Square Edge-Lit Flat Panel Ceiling Light

This streamlined light panel is a superb, minimalist bathroom lighting fix that blends seamlessly into the ceiling. The square shape and flat profile make this fixture disappear into the architecture, ensuring it doesn’t visually clutter a small space. The thin design is secured flush to the ceiling, giving it a subtle, high-end, and contemporary appearance.
The light is evenly diffused across the large surface area, bathing the room in a bright, uniform glow. This avoids the harsh shadows that smaller, concentrated lights often cast. Because the fixture is integrated and completely enclosed, it provides excellent protection against moisture and steam, making it highly suitable for bathrooms. This clean lighting choice updates any dull bathroom instantly and efficiently.
Required Materials List
- One (1) Square LED Flush Mount Panel (Damp-rated).
- Mounting bracket and screws (included).
- Non-contact voltage tester.
- Phillips screwdriver.
- Wire strippers/cutters and electrical tape.
- Stepladder.
- Safety glasses and work gloves.
DIY Installation Instructions (Flush Mount Panel)
- De-Energize the Circuit: Switch off the power to the light switch and circuit at the main breaker box. Verify with the voltage tester that the electricity is completely off at the ceiling junction box.
- Remove the Existing Fixture: Carefully remove the existing light fixture, disconnecting the wires as described in previous steps.
- Install the Mounting Bracket: Affix the new panel light’s mounting bracket to the ceiling junction box. Ensure the bracket is straight and sturdy before proceeding.
- Connect the Wiring: Hold the flat panel light up close to the ceiling. Connect the house wires to the corresponding wires on the new fixture: Black to Black, White to White, Ground to Ground. Secure the connections with wire nuts.
- Secure the Panel: Gently push the connected wires back into the ceiling junction box. Line up the panel light with the mounting bracket and secure it using the manufacturer’s locking mechanism, usually a set of screws or turn-locks. Ensure the panel sits flush against the ceiling.
- Test the Light: Turn the power back on at the breaker panel. Test the light to confirm the entire surface illuminates evenly and brightly.
13. 〰️ Flexible Corner Track Lighting
Product Name: Curvable LED Track Lighting System

Track lighting offers an exceptional bathroom lighting fix because of its high degree of adjustability and flexibility. This system uses a continuous track, which can even curve around corners, to power multiple movable spotlights. The white finish keeps the look clean and unobtrusive against a light-colored ceiling.
The main advantage of track lighting is the ability to aim light exactly where you need it. You can direct one spotlight toward the shower, another toward the vanity, and a third to brighten a dark corner. This directional control is far more effective than a single overhead light, making it a highly customizable solution for oddly shaped or small bathrooms. Installing a modern, streamlined track system provides powerful, focused illumination without taking up visual space on the walls.
Required Materials List
- One (1) Curvable Track Lighting System (Damp-rated for bathroom use).
- Three or more (3+) LED Track Heads/Spotlights.
- Mounting hardware (track supports, end caps, and mounting plate).
- Non-contact voltage tester.
- Phillips screwdriver and drill.
- Wire strippers/cutters and electrical tape.
- Stepladder.
- Safety glasses and work gloves.
DIY Installation Instructions (Track System)
- Safety Shutdown: Cut the electricity to the existing ceiling light at the main breaker. Test the junction box with your voltage tester to verify zero power.
- Determine Layout: Map out the exact path the track will take across the ceiling. Use a pencil to mark the location of the central junction box and all necessary support clips.
- Install Mounting Plate and Supports: Attach the main mounting plate to the ceiling junction box. Then, drill pilot holes and use anchors and screws to install the track support clips along the marked path.
- Wire the System: Connect the track’s electrical connector to the junction box wires: Black to Black, White to White, Ground to Ground. Push the wires into the box and secure the track’s terminal canopy cover over the box.
- Snap the Track into Place: Carefully push the track into the support clips along its entire length. Attach the power supply connector to the track over the junction box. Install end caps on the exposed ends of the track for safety and aesthetics.
- Install and Aim Heads: Slide the individual spotlight heads into the track and twist them to lock them into place. Direct each spotlight head toward a specific area (vanity, shower, towel rack) to layer your light.
- Test the Light: Restore power at the breaker panel and confirm that all spotlights are functioning and correctly aimed.
14. ???? Textured Woven Ambient Light
Product Name: Bohemian Woven Rattan Flush Mount Light

A lighting fixture like this introduces beautiful texture and warm, filtered light, creating a soothing bathroom lighting fix. The natural rattan weave brings an organic, Bohemian, or coastal style to the space. When illuminated, the shade casts striking geometric shadows and patterns onto the ceiling and upper walls.
This interesting play of light adds a unique visual dimension, which is great for bathrooms that lack architectural detail. Because this is a flush-mount fixture, it hugs the ceiling tightly, keeping it out of the way in a small room. The filtered light provides a comforting ambiance, though you may need a separate, stronger vanity light for detailed task work. This is an excellent choice for adding character and softening the typically harsh lines of a bathroom.
Required Materials List
- One (1) Woven Flush Mount Fixture (Damp-rated recommended).
- One (1) LED A-style bulb (or similar, depending on fixture).
- Mounting hardware (included).
- Non-contact voltage tester.
- Phillips screwdriver.
- Wire strippers/cutters and electrical tape.
- Stepladder.
- Safety glasses and work gloves.
DIY Installation Instructions (Flush Mount Light)
- Safety Protocol: Turn off the main power to the light switch and the entire circuit at your main breaker panel before touching any wires. Use the voltage tester to ensure the wires at the ceiling junction box are completely dead.
- Remove the Existing Light: Remove the old fixture by disconnecting the three sets of wires.
- Attach the Mounting Plate: Secure the mounting crossbar or plate to the ceiling junction box with the screws provided with the new light.
- Connect the Wires: Hold the fixture base near the ceiling and connect the wires: Black to Black, White to White, Ground to Ground. Secure each connection with a wire nut.
- Secure the Base: Gently push the connected wires into the junction box. Align the base plate of the new fixture with the mounting plate and secure it firmly.
- Install Bulb and Shade: Screw the required light bulb into the socket. Finally, attach the rattan woven shade to the fixture base. This usually involves small screws, finials, or a locking ring.
- Test the Light: Turn the power back on at the breaker panel and test the switch to see the beautiful pattern cast by the woven shade.
15. ☁️ Daylight Mimicking Sky Panel
Product Name: Large Format LED Faux Skylight Panel

This unique fixture offers the most dramatic visual bathroom lighting fix, providing the illusion of a bright window or skylight. The large, flat panel features a backlit image of a blue sky and soft clouds, mimicking natural daylight. This is an amazing solution for windowless or basement bathrooms, as it immediately makes the small space feel open and airy.
The powerful, broad light emitted from the panel serves as incredible general ambient illumination, effectively brightening the entire room. This fixture is a fantastic example of using light creatively to overcome architectural limitations. It shifts the focus away from the room’s constraints, offering a soothing view that greatly enhances the mood and sense of space.
Required Materials List
- One (1) Large LED Sky Panel (Damp-rated).
- Mounting hardware/frame (included).
- Non-contact voltage tester.
- Phillips screwdriver and drill.
- Wire strippers/cutters and electrical tape.
- Level and measuring tape.
- Safety glasses and work gloves.
- Two people (necessary for lifting and hanging).
DIY Installation Instructions (Recessed or Surface Mount Panel)
- Strict Safety Precaution: Turn off the electricity to the existing light switch and the entire circuit at the main breaker panel before touching any wires. Verify that the ceiling wires are completely safe to handle using a voltage tester.
- Install the Mounting Frame: This type of panel often uses a perimeter frame or set of brackets. Measure and mark the exact placement on the ceiling. If recessing, trace the cutout area; if surface mounting, mark the mounting points for the frame. Secure the frame to the ceiling, ensuring it is level and stable.
- Connect the Driver: The panel requires a separate LED driver box. Connect the house wiring (Black to Black, White to White, Ground to Ground) to the driver box’s input wires. Secure these connections with wire nuts.
- Connect and Position: Connect the driver box’s output cable to the input cable located on the back of the sky panel. Place the driver box neatly within the ceiling cavity or mounted to the side of the frame.
- Mount the Panel: With your helper, carefully lift the large panel and secure it into the frame or mounting brackets. Ensure it sits flush and securely in place.
- Test the Light: Clean up and turn the power back on at the breaker. Test the light to confirm the entire surface illuminates evenly and brightly.
16. ⚓ Industrial Galvanized Cage Lights
Product Name: Cage-Enclosed Coastal Bulkhead Fixture

These rugged, industrial fixtures are a truly unique bathroom lighting fix, drawing inspiration from classic nautical or warehouse designs. The light on the wall features a galvanized metal finish and a protective cage over a ribbed glass dome, giving the fixture a raw, mechanical appeal. They come in both wall-mount (sconce) and ceiling-mount styles, offering versatility in where you place your primary light source.
The strong metal cage makes these lights incredibly durable and highly suitable for damp or wet zones, like directly above a shower. The thick, textured glass diffuses the bulb’s output, giving off a warm, contained light that enhances a rustic or modern-industrial bathroom theme. Using clear Edison-style bulbs emphasizes the vintage, utilitarian look of the cage design. These fixtures provide strong character without overwhelming a smaller space.
Required Materials List
- One (1) or Two (2) Galvanized Cage Fixtures (Wet-rated or Damp-rated).
- Decorative LED light bulbs (E26 base, check fixture specifications).
- Mounting hardware (included).
- Non-contact voltage tester.
- Phillips screwdriver.
- Wire strippers/cutters and electrical tape.
- Stepladder.
- Safety glasses and work gloves.
DIY Installation Instructions (Ceiling or Wall Mount)
- Mandatory Power Cut: Turn off the main electricity to the room at the circuit breaker. Use a non-contact voltage tester to confirm that the wiring at the junction box is completely dead.
- Remove the Existing Light: Carefully remove the old fixture by disconnecting the Black (Hot), White (Neutral), and Ground wires.
- Attach the Mounting Plate: Secure the new fixture’s mounting bracket or crossbar to the existing ceiling or wall junction box using the provided screws. Ensure it is firmly secured.
- Connect the Wiring: Hold the fixture base near the wall. Connect the fixture’s wires to the house wires with wire nuts: Black to Black, White to White, Ground to Ground (or to the ground screw on the mounting bracket).
- Secure the Housing: Gently push the connected wires into the junction box. Attach the main metal housing of the fixture to the mounting plate and secure it tightly with the provided fasteners. The industrial design often uses visible bolts or large screws for this step.
- Install the Bulb and Glass: Screw in your decorative light bulb. Fit the protective glass dome and then secure the outer metal cage, often by tightening small clips or screws.
- Final Test: Flip the power back on at the breaker panel and test the light switch.
17. ???? Accent Strip Under Cabinet Lighting
Product Name: LED Floating Vanity Undermount Strip

This type of hidden light offers a subtle, sophisticated bathroom lighting fix by layering ambient illumination. The slim LED strip is mounted discreetly beneath the floating vanity, casting a soft glow downward onto the floor and the wall directly beneath the cabinet. This creates a luxurious, high-end effect known as toe-kick lighting.
The blue-toned white light provides a cool, clean contrast to the warmer light shining from above the cabinet, adding depth to the small room. Installing an LED strip here is often done with a motion sensor or a separate night light switch. This creates a safe, low-level pathway light for nighttime visits. It’s an inexpensive and highly effective way to add atmosphere and functional light without cluttering any visual space.
Required Materials List
- One (1) Waterproof LED Light Strip or Linear Fixture (12V or 24V system, damp-rated).
- LED power supply/driver (required for 12V/24V strips).
- Mounting clips or high-strength double-sided adhesive (check strip type).
- Non-contact voltage tester.
- Wire strippers and low-voltage wiring.
- Optional: Motion sensor switch.
DIY Installation Instructions (Low-Voltage LED Strip)
- Power Safety: Turn off the power to the circuit where you will be tapping into the electricity, typically a nearby wall switch or junction box. Verify with your tester.
- Mount the LED Driver: The driver (transformer) converts household voltage to the low voltage needed for the strip. Install this driver inside the vanity cabinet or near the power source. Connect the house wires (Black/White/Ground) to the driver’s input wires. DO NOT turn the power back on.
- Prepare and Attach the Strip: Measure the length you need and cut the LED strip at the designated cutting points. Peel the backing from the strip’s adhesive (if applicable) or secure the strip to the underside of the vanity using the mounting clips. Run the low-voltage wire back to the installed driver.
- Connect Low-Voltage: Connect the strip’s low-voltage wires to the driver’s output wires. This connection usually involves simple snap-in connectors or soldering, depending on the kit.
- Conceal Wiring: Neatly hide the wires using small plastic wire clamps or raceways, running them along the back edge of the vanity.
- Test and Complete: Ensure all connections are secure and dry. Turn the power back on and test the light switch or motion sensor functionality.
18. ???? Backlit Shower Niche Accent
Product Name: Integrated LED Strip Shower Shelf Lighting

This subtle yet stunning fixture is an incredible bathroom lighting fix for the shower area. The LED strip is tucked neatly into the recessed shower niche, framing the textured tile with a warm glow. This not only highlights the products stored on the shelf but also serves as beautiful, soft mood lighting for the shower itself.
Illuminating the niche turns this functional storage space into a stylish focal point. The hidden light source emphasizes the beautiful patterns of the accent tile without causing glare. Since this fixture is installed inside the shower, it must be rated for wet locations to ensure safety and longevity. This detail adds a touch of custom luxury to a small bathroom renovation.
Required Materials List
- One (1) Waterproof LED Strip Light Kit (IP65 or higher wet-rated, low-voltage).
- LED Channel/Aluminum housing (to protect the strip and diffuse the light).
- Waterproof silicone sealant.
- Low-voltage wire and LED driver (see previous step).
- Non-contact voltage tester.
- Screwdriver, drill, and anchors (if needed for the channel).
DIY Installation Instructions (Wet-Rated Accent Light)
- Power Safety: Turn off all power to the area at the main breaker. Crucially, run the low-voltage wiring for this light from the driver (transformer) outside the wet zone (i.e., outside the shower or in the vanity). The driver must never be inside the shower area.
- Mount the Channel: Measure the inside dimensions of your shower niche. Cut the aluminum channel to fit the top and/or sides of the niche opening. Mount the channel securely using stainless steel screws or a construction adhesive/silicone sealant if you prefer no visible fasteners.
- Install the LED Strip: Place the wet-rated LED strip inside the channel. Connect the low-voltage wires. Run the wires discreetly through a small, sealed hole in the niche wall to the dry side where the LED driver is located. Seal this hole meticulously with waterproof silicone sealant to prevent any moisture penetration.
- Connect to Driver: Connect the low-voltage wires to the driver’s output.
- Seal and Finish: Apply a generous bead of waterproof silicone sealant around all edges of the mounted channel to prevent water from reaching the strip or the channel’s connections. Allow the sealant to cure completely as directed on the packaging (usually 24 hours).
- Test: Restore power only after the sealant has dried. Test the niche light to confirm functionality.
19. ???? Architectural Cove Lighting
Product Name: Recessed Perimeter LED Strip Lighting

This is an advanced, stunning bathroom lighting fix that uses architectural elements to great effect. LED strips are hidden inside a dropped ceiling recess, or “cove,” casting a gentle, continuous wash of warm light upwards and sideways. This technique, called cove lighting, creates a luminous glow that bounces off the ceiling and diffuses softly into the room.
The light source is completely invisible, making the ceiling look cleaner and lending a high-end, bespoke feel to the space. The glowing perimeter draws attention to the ceiling’s height, effectively combating the closed-in feeling of a small bathroom. This is an excellent way to achieve both ambient light and a strong architectural focal point simultaneously.
Required Materials List
- LED Strip Lighting (Damp-rated, low-voltage).
- Aluminum channel (optional, but recommended for heat dissipation and clean lines).
- LED power supply/driver.
- Low-voltage wire and connectors.
- Non-contact voltage tester.
- Material for building the cove (wood framing, drywall) – Assumed pre-built for DIY installation.
DIY Installation Instructions (Inside a Pre-Built Cove)
- Prerequisite: This DIY assumes a professional has already built the recessed channel (the cove) into the ceiling. Turn off the power to the circuit at the main breaker.
- Place the Driver: Install the LED driver (transformer) in an accessible location outside the cove, such as in the attic or inside a nearby cabinet, running the low-voltage wire to the cove area.
- Prepare the Strip: Measure the length of the perimeter inside the cove. Cut the LED strip to size. If using an aluminum channel, place the strip inside it for protection and cleaner installation.
- Install the Strip: Use the adhesive backing or mounting clips to attach the strip (or the channel holding the strip) inside the cove so the light beam faces the ceiling or the adjacent wall, depending on the desired effect.
- Connect Low-Voltage: Run the low-voltage wire from the installed strip back to the driver. Secure the connection.
- Test: Restore power. Pair the remote or wall switch with the controller. Test the full range of colors and dimming functions.
20. ???? Triple Surface-Mount Spotlights
Product Name: Adjustable Ceiling Cylinder Spotlights

Surface-mounted spotlights are a great alternative to recessed lighting when you cannot cut large holes in the ceiling but still want directional light. This arrangement of three small, white cylinders provides strong, focused bathroom lighting fixes that can be aimed like miniature track lights. Their small diameter ensures they do not visually weigh down the ceiling in a small space.
These lights are placed directly above a piece of art or a decorative tile panel, turning a plain wall into an illuminated feature. The tight beam of light creates an “art gallery” effect, highlighting textures and colors with sharp contrast. This is a very clean and modern look that achieves the goal of bright, directed light without the high labor costs of installing deep recessed cans.
Required Materials List
- Three (3) Surface Mount Ceiling Spotlights (Damp-rated).
- Mounting hardware (included).
- Non-contact voltage tester.
- Phillips screwdriver and drill.
- Wire strippers/cutters and electrical tape.
- Stepladder.
- Safety glasses and work gloves.
DIY Installation Instructions (Multiple Spotlights)
- Power Safety: Disconnect the electricity to the circuit at the main breaker. Test the junction box with your voltage tester to verify zero power.
- Determine Layout: Decide on the spacing for the three spotlights. They should be equidistant from each other and centered above the area you want to illuminate. The existing junction box will serve the central light, and you will need to run new wiring inside the ceiling to the other two spots. (New wiring runs are complex; consider an electrician if you are unsure.)
- Install Central Light: Install the mounting bracket for the central light onto the existing junction box. Connect the wires: Black to Black, White to White, Ground to Ground. Secure the central light housing to the bracket.
- Install Side Lights: For the two side lights, you will need to tap into the power lines running from the central light. Carefully install the mounting brackets for the side lights. Connect the new wire runs to the side light fixtures, again securing the three wires with wire nuts. Attach the side light housings to the brackets.
- Aim and Adjust: Once all three lights are securely mounted, tilt and rotate the light heads so they focus precisely on the desired area, such as the mirror or art.
- Test the Lights: Restore power at the breaker panel and test the switch to confirm all three spotlights function correctly.
21. ???? Embedded Floor and Baseboard Lighting
Product Name: Linear LED Baseboard and Floor Inset System

This advanced architectural lighting concept is a sophisticated bathroom lighting fix that creates high drama and enhances safety. It uses seamless linear LED strips integrated directly into the baseboard and the floor’s edge. This casts light both upward onto the wall and across the floor, creating a mesmerizing “runway” effect.
The main benefit is functional: it provides soft, glare-free night lighting, making it safe to navigate the bathroom after dark without turning on harsh main lights. The embedded nature of the lighting means it takes up zero physical space in an already compact room. This design element looks incredibly high-end, giving a modern, futuristic edge to your small bathroom remodel.
Required Materials List
- Recessed LED Aluminum Channel (with diffuser cover, damp-rated).
- IP65 or higher LED Strip Lighting (low-voltage, damp-rated).
- LED power supply/driver.
- Low-voltage wire and connectors.
- Non-contact voltage tester.
- Drill, saw, and router (for cutting baseboard and floor channels).
- Electrical tape and wire nuts.
- Safety glasses and work gloves.
DIY Installation Instructions (Baseboard and Floor)
- Safety Precautions: Turn off the main power to the circuit where you will connect the LED driver. Verify that all house wiring is dead using a voltage tester.
- Cut Channels: Use a router and saw to cut a thin, precise groove along the bottom of the baseboard and, if applicable, a thin channel into the edge of the floor tiles or wood. The groove must match the dimensions of your aluminum channel.
- Mount the Driver: Connect the LED driver to the house wiring in a hidden, accessible location (like inside a cabinet or closet). Run the low-voltage wires into the baseboard area.
- Install the Strip and Channel: Affix the LED strip lighting inside the aluminum channels. Place the channels securely into the cut grooves on the baseboard and floor.
- Connect and Conceal: Connect the low-voltage wires from the strip to the driver’s output. Use small connectors and push any excess wire neatly out of sight behind the baseboard.
- Seal and Finish: Snap the diffuser cover onto the channel for a clean look. Apply painter’s caulk or sealant along the edges where the channel meets the baseboard to blend the installation seamlessly.
- Test the Light: Turn the power back on and test the dramatic new lighting effect.
22. ???? Backlit Stone Feature Wall
Product Name: Translucent Onyx Backlight Panel

While this is less of a fixture and more of a bold design choice, using a backlit translucent panel is a phenomenal bathroom lighting fix for ambient light. The image shows a thick slab of onyx or marble installed as a vanity backsplash or divider wall. Powerful LED panels are hidden behind the stone, causing the stone’s natural veining and patterns to glow with soft, warm light.
This glowing wall is a showstopper, providing incredible ambient light that fills the room without the need for visible fixtures. Because the light is evenly diffused across a large surface, it drastically reduces shadows. For a small bathroom, this technique eliminates visual clutter and creates a stunning, custom focal point that makes the entire room feel expensive and expansive.
Required Materials List
- LED Light Panel Sheets (Damp-rated, highly diffused).
- Translucent stone slab (Onyx, Alabaster, etc.) — Professional installation required.
- LED power supply/driver.
- Non-contact voltage tester.
- Mounting brackets/framework (for securing the stone panel).
- Waterproof silicone sealant.
DIY Installation Instructions (LED Panel Installation Behind Stone)
- Safety Protocol: Turn off the main power to the area. This installation is generally done before the stone is mounted.
- Mount the Framework: A metal framework must first be built to hold the LED panels and create a gap between the wall and the stone for the wiring. Secure this framework firmly to the wall.
- Install the LED Panels: Place the LED light panel sheets into the framework. These panels are typically modular and plug together. Ensure the light panels are evenly spaced and cover the entire area behind the stone. Connect the panels to the low-voltage wires running back to the external driver.
- Connect the Driver: Install the LED driver in a remote, accessible location (like an adjacent room or ceiling access panel) and connect it to the house wiring (Black to Black, White to White, Ground to Ground).
- Stone Mounting (Professional Recommended): The stone slab is then carefully mounted onto the front of the metal framework using specialized mounting systems and adhesives. This step requires professional expertise due to the weight and fragility of the stone.
- Final Test: Once the stone is fully secured and the power is restored, test the light to confirm the entire stone glows uniformly.
23. ???? Dynamic Color Corner Lighting
Product Name: Vertical RGB Corner Wall Washers

This striking design is a creative bathroom lighting fix that focuses entirely on ambiance and mood. Two opposing wall corners are illuminated vertically by integrated linear LED lights. The different colored lights (warm white/yellow on the left, and a multi-color gradient on the right) demonstrate the versatility of modern RGB-W lighting systems.
Using light to emphasize the height of the walls draws the eye up, which tricks the brain into perceiving the small room as taller. This technique eliminates dark shadows in the corners, a common problem in compact spaces. The option to switch between a clean white light (for task) and vibrant colors (for relaxation) provides amazing flexibility and personality.
Required Materials List
- Two (2) Vertical LED Channel Fixtures (RGB-W, damp-rated).
- Controller unit and remote/wall switch.
- LED power supply/driver.
- Wire and low-voltage connectors.
- Non-contact voltage tester.
- Screwdriver, drill, and anchors.
DIY Installation Instructions (Integrated Corner Fixtures)
- Power Safety: Turn off the power to the circuit. Locate an existing power source (e.g., an existing switch or outlet junction box) and verify the power is off.
- Mount the Channel: Measure the height of the corner. Cut the vertical LED channel fixtures to fit exactly. Secure the channels into the inner corner of the wall using screws and anchors.
- Install the Strip: Place the RGB-W LED strip inside the channel and snap on the diffuser cover. Run the low-voltage wires discreetly inside the wall or through the channels to the location of the controller and driver.
- Install Controller and Driver: Install the LED driver and the RGB-W controller in an easily accessible but hidden area (like behind a vanity). Connect the low-voltage wires from the strip to the controller, and the controller to the driver. Finally, connect the driver to the house wiring (Black, White, Ground).
- Test: Restore power. Pair the remote or wall switch with the controller. Test the full range of colors and dimming functions.
24. ???? Backlit Floating Glass Shelves
Product Name: Frosted Glass Shelf with Integrated LED Light

These illuminated shelves provide a beautiful dual-purpose bathroom lighting fix that is both functional storage and ambient light. The thick glass shelf is suspended by minimalist metal brackets, with an integrated LED strip running along the underside of the glass. The light shines downward, illuminating the counter or sink below.
Because the glass is frosted, the light is softly diffused, creating a luxurious glow that highlights any decorative items placed on the shelf. The light reflects beautifully off the glass, making the whole assembly look lighter and more open—a huge plus for a small room. The shelf above the main unit also features a thin, linear light, providing perfect layered illumination for the wall.
Required Materials List
- Two (2) LED Integrated Floating Glass Shelves (Damp-rated).
- Mounting hardware (brackets, screws, included).
- LED power supply/driver (may be integrated into the shelf).
- Non-contact voltage tester.
- Level, measuring tape, and pencil.
- Drill and drill bits.
DIY Installation Instructions (Illuminated Shelves)
- Power Safety: Shut off the electricity to the relevant wall circuit at the main breaker. Verify the power is off.
- Mark Placement: Determine the placement of your shelves above the vanity. Use a level and measuring tape to mark the location of the mounting bracket holes for both shelves. Ensure they are straight and centered.
- Drill and Anchor: Drill pilot holes at the marked points. Insert wall anchors if you are drilling into drywall rather than a wood stud.
- Connect Wiring: The shelf brackets often hide the wiring connection point. Connect the shelf’s low-voltage wiring to the house wiring that you have run into the wall behind the shelf location. (If new wiring is required, consult an electrician.)
- Secure the Brackets: Mount the support brackets to the wall using the supplied screws.
- Mount the Shelves: Slide or lock the glass shelf onto the support brackets. If the shelves include a final cover plate, secure it to hide the bracket and wiring connections completely.
- Test the Light: Turn the power back on and confirm that the integrated LED light within the glass shelf illuminates beautifully.
25. ⚪ Recessed Floor Spot and Wall Accent
Product Name: Low-Profile Square Floor Recessed Step Light

This subtle detail provides safety and dramatic effect, acting as a crucial secondary bathroom lighting fix. The image shows a small, square, recessed light installed flush into the floor tiles. Its tight beam of warm light is aimed upward and outward, highlighting the texture of the wall. A smaller complementary light is placed low on the wall, often near a baseboard.
This low-level lighting is commonly used as a safety light or night light, guiding you across the floor without disturbing your sleep cycle with harsh overhead glare. Since the fixtures are mounted flush, they are completely out of the way, which is always important in a compact space. The warm glow creates beautiful ambient light and depth.
Required Materials List
- One or more (1+) IP67 Rated Floor Recessed Lights (Low-voltage LED).
- Corresponding IP65 Rated Wall Recessed Light (Low-voltage LED).
- Hole saw, trowel, and tile adhesive (if cutting into tile).
- LED power supply/driver.
- Non-contact voltage tester.
- Wire and low-voltage connectors.
DIY Installation Instructions (Floor and Wall Recessed)
- Safety Disconnect: Turn off the main power to the circuit. The LED driver will connect here.
- Cut Floor and Wall Openings: Use a specialized hole saw to cut the openings for the floor and wall recessed lights. This requires care, especially when cutting ceramic or porcelain tile.
- Install the Driver: Install the LED driver in a remote location and run the low-voltage wires to the recessed light locations.
- Connect and Seal Floor Light: Connect the low-voltage wires to the back of the floor fixture. Push the fixture into the hole. Because this is a floor light, use waterproof sealant or tile grout around the perimeter to ensure absolutely no water can seep beneath the floor.
- Connect Wall Light: Connect the low-voltage wires to the back of the small wall light. Push the fixture into the wall opening and secure it.
- Curing and Test: Allow any sealant or grout around the floor light to cure completely. Restore power and test the dramatic floor accent lighting.
26. ???? Vintage Ribbed Glass Barrel Sconces
Product Name: Art Deco Fluted Glass Pillar Sconces

These cylindrical sconces provide an elegant, vintage-inspired bathroom lighting fix. The ribbed, fluted glass diffuses the inner light source, creating a warm, soft glow that is flattering to the face. The brass bands holding the glass add a luxurious, Art Deco touch, lending character to the room.
Mounting these vertical fixtures on either side of a mirror ensures even, cross-directional illumination, which is crucial for task lighting. The vertical orientation draws the eye upward, which visually increases the height of the room—a great trick for small bathrooms. This style is a classic choice that offers both high aesthetic appeal and strong, diffused light output.
Required Materials List
- Two (2) Fluted Glass Pillar Sconces (Damp-rated).
- Two (2) T-style or tubular LED bulbs.
- Mounting hardware (included).
- Non-contact voltage tester.
- Phillips screwdriver and drill.
- Wire strippers/cutters and electrical tape.
DIY Installation Instructions (Vertical Sconces)
- Power Shutdown: Turn off the power to the wall junction boxes at the main breaker. Verify that the power is off using your voltage tester.
- Remove Old Fixtures: Carefully remove any existing lights, disconnecting the Black, White, and Ground wires.
- Install Mounting Plates: Secure the new mounting plates (crossbars) to the junction boxes on both sides of the mirror. Use a level to ensure both plates are at the exact same height.
- Connect Wires: Connect the new fixture’s wires to the house wiring (Black to Black, White to White, Ground to Ground). Secure all connections with wire nuts.
- Secure Fixture Housing: Gently tuck the wires into the junction box. Attach the main body of the sconce to the mounting plate.
- Install Bulbs and Glass: Screw in the tubular LED bulbs. Carefully place the ribbed glass shade over the bulb and secure the brass bands or locking elements that hold the glass in place.
- Test the Light: Restore power at the breaker panel and switch on your new, sophisticated lights.
27. ???? Natural Wood Cube Wall Light
Product Name: Minimalist Wooden Cube Up/Down Light

This unique sconce is a charming bathroom lighting fix that introduces natural texture and a warm aesthetic. The body is a simple wooden cube that sits slightly off the wall. It features a small, recessed LED light inside, which casts a wash of light both upward and downward onto the wall surface. This highlights the beautiful wood paneling it is mounted on.
Using wood texture in a bathroom adds a spa-like, organic feel that is both calming and inviting. The minimalist design of the cube takes up very little physical space, making it visually light in a compact room. The directional light creates drama and accentuates the wall surface, which is a great way to add visual interest without cluttering the room.
Required Materials List
- One (1) Wooden Cube Sconce (Damp-rated).
- Mounting plate and screws (included).
- Non-contact voltage tester.
- Phillips screwdriver and drill.
- Wire strippers/cutters.
DIY Installation Instructions (Cube Sconce)
- Safety Disconnect: Cut the power to the junction box in the wall at the main breaker. Use a voltage tester to confirm zero power.
- Remove Old Fixture: If you are replacing a light, remove it by disconnecting the wiring.
- Install Mounting Plate: Secure the mounting bracket to the wall junction box. This bracket may be a small piece of wood or metal that the cube fixture locks onto.
- Connect Wires: Connect the wires: Black to Black, White to White, Ground to Ground. Secure with wire nuts. Gently tuck the connections into the junction box opening.
- Mount the Cube: Align the wooden cube fixture with the mounting bracket and secure it firmly. For fixtures with external wiring, ensure the cord is run cleanly and secured with small clips if needed (as shown in the image).
- Test: Restore power at the breaker panel and test the light to confirm the up-and-down light wash effect.
28. ???? Concrete Look Vanity Sconce
Product Name: Industrial Concrete Bell Shade Sconce

Introducing a textured, moody element like this concrete-look sconce is a fantastic bathroom lighting fix for those aiming for an industrial or brutalist aesthetic. The bell-shaped shade appears to be made of textured, speckled concrete, providing incredible visual weight and contrast against a simple wall. The raw metal piping holding the shade adds to the industrial feel.
This fixture provides a direct, downward-focused light that is great for task illumination. The shade directs the light straight onto the vanity area below, preventing light from scattering unnecessarily around a small room. This focus helps highlight the sink or counter. The contrast between the rough concrete and the bright, warm glow of the light creates a stunning effect.
Required Materials List
- One (1) Concrete Shade Wall Sconce (Damp-rated).
- Light bulb (G16 or similar, check socket size).
- Mounting plate and screws (included).
- Non-contact voltage tester.
- Phillips screwdriver and drill.
- Wire strippers/cutters.
DIY Installation Instructions (Industrial Sconce)
- Power Shutdown: Turn off the main electricity to the room at the breaker. Use your tester to confirm the junction box is completely off.
- Install Mounting Plate: Secure the mounting crossbar to the existing wall junction box.
- Connect Wires: Connect the fixture’s wires to the house wires (Black to Black, White to White, Ground to Ground). Secure them tightly with wire nuts.
- Secure the Fixture: Align the sconce’s backplate with the mounting crossbar. Secure the entire fixture body to the wall, making sure it sits flush.
- Install the Bulb: Screw the light bulb into the socket inside the concrete-look shade.
- Test: Turn the power back on and check the focused light cast by the bell shade.
29. ???? Japanese-Style Table Lamps
Product Name: Plug-In Japanese Shoji-Style Lanterns

While these are portable lamps, using decorative, ambient plug-in lights is a flexible and inviting bathroom lighting fix that adds a spa-like feel. The paper lantern design and the portable rectangular lamp provide a beautiful, soft, diffused warm light. This style fits perfectly with a minimalist or Japanese-inspired bathroom.
Because these lights are purely decorative, they allow you to create relaxing zones of soft, yellow light, which is amazing for unwinding in the bath. They are simply placed on a shelf or the floor and plugged into an accessible outlet. This option requires absolutely no permanent electrical work, making it the easiest DIY upgrade available. Remember to ensure the placement is safe and the lamp is away from splashes or humidity.
Required Materials List
- One (1) or Two (2) Plug-In Lantern Lamps (Use low-wattage LED bulbs).
- IP65 outlet cover (to protect the outlet from moisture).
- Extension cord (if needed).
DIY Installation Instructions (Plug-In Accent Lights)
- Choose Location: Identify a high shelf, a closed cabinet top, or a low, safe corner away from the splash zone (at least three feet from the tub/sink).
- Install Outlet Safety: If your outlet is close to the sink, temporarily replace the standard outlet cover with a weatherproof, GFCI-rated cover (IP65) for moisture protection.
- Position and Plug In: Place the lanterns in their desired locations. Plug the cord into a nearby safe outlet. If using an extension cord, ensure the cord is run neatly and securely along the baseboard, away from the floor where it could be a tripping hazard.
- Enjoy: Turn the lamps on to enjoy the soothing ambient light.
30. ???? Minimalist Spot Wall Accents
Product Name: Multi-Level Cube Directional Spotlights

These small, cube-shaped accent lights are a highly contemporary bathroom lighting fix, used here to create dynamic pools of light. They are mounted at different heights and angles, focusing tight beams of warm light onto the wall, which produces dramatic shadow play. Some cubes may feature a metallic brass finish, while others are a dark, matte color, adding visual contrast.
This setup is purely for accent lighting, which is essential for creating depth and making a small room feel less flat. The fixtures themselves are tiny and minimalist, so they take up very little wall space. They work brilliantly as a complement to stronger vanity or overhead lighting, allowing you to fine-tune the mood and highlight specific textures.
Required Materials List
- Three (3) or more Cube Accent Spotlights (Damp-rated).
- Small LED GU10 or MR16 bulbs (check fixture specification).
- Mounting hardware (included).
- Non-contact voltage tester.
- Phillips screwdriver and drill.
DIY Installation Instructions (Multiple Small Wall Spotlights)
- Power Shutdown: Turn off the main power to the wall circuit. Verify that the power is off using your tester.
- Plan the Layout: Determine the precise location and spacing of the three (or more) accent lights. Mark the center point for each fixture’s mounting plate. This installation generally requires running new wiring inside the wall between the fixtures, which is best handled by an electrician.
- Install Mounting Plates: Secure the mounting plate for each cube light onto the marked spots on the wall.
- Connect Wiring: Connect the wires for all fixtures: Black to Black, White to White, Ground to Ground. Ensure all new wires are correctly routed and secured within the walls or junction boxes.
- Secure the Cubes: Attach the cube fixture bodies to the mounting plates. Insert the small LED bulbs into the sockets.
- Adjust and Test: Rotate and tilt each cube’s light source to create the desired focused light beams and shadow accents. Restore power and test the dramatic effect.
31. ???? Crystal Prism Wall Sconce
Product Name: Tiered Chrome and Crystal Wall Sconce

This opulent fixture is a dazzling bathroom lighting fix that adds a dramatic, luxurious sparkle to a small space. Multiple tiers of suspended crystal prisms reflect and refract the light source, casting beautiful, star-like patterns and rainbows across the surrounding walls. The chrome backplate is sleek and modern, providing a clean contrast to the elaborate crystals.
Although it is a highly decorative piece, the fixture is wall-mounted, which keeps it from intruding into the room’s main footprint. The bright, dispersed light ensures the fixture acts as both a functional light source and a stunning piece of wall art. Adding this element of glamour instantly transforms a basic bathroom into a high-end powder room.
Required Materials List
- One (1) Crystal Wall Sconce (Damp-rated).
- G9 or E12 LED bulbs (check fixture specification).
- Mounting hardware (included).
- Non-contact voltage tester.
- Phillips screwdriver.
- Wire strippers/cutters and electrical tape.
- Stepladder.
- Safety glasses and work gloves.
DIY Installation Instructions (Decorative Sconce)
- Crucial Safety Step: Turn off the main power to the wall junction box at the circuit breaker. Use a voltage tester to confirm the power is completely off.
- Remove Old Fixture: Disconnect and remove any existing light fixture.
- Attach Mounting Plate: Secure the sconce’s mounting plate or crossbar to the wall junction box using the provided screws.
- Connect the Wiring: Connect the fixture’s wires to the house wires: Black to Black, White to White, Ground to Ground. Secure each connection with a wire nut.
- Secure the Base: Tuck the wires neatly into the junction box. Align the sconce’s chrome backplate with the mounting plate and secure it firmly to the wall.
- Attach Crystals and Bulbs: Screw the required light bulbs into the socket. Finally, attach the crystal strands or tiers to the fixture frame, which can often be the most time-consuming step.
- Test the Light: Restore power and flip the switch to see the dazzling prism effect.
32. ????️ Leather Strap Hanging Sconce
Product Name: Rustic Leather and Wood Wall Sconce (Plug-In)

This artisan sconce provides an unconventional, warm bathroom lighting fix that emphasizes texture and handcrafted design. The light fixture features a wood mounting plate from which a bare bulb socket is suspended by a sturdy leather strap. The leather wraps around a small wooden bar, creating a simple, functional wall accent.
Since this model is plug-in, it offers an incredibly easy and commitment-free way to change the look of your small bathroom without hiring an electrician. The exposed filament LED bulb casts a highly inviting, warm glow. This fixture works best in dry powder rooms or as a unique accent light near a vanity, lending a rugged, refined, or rustic aesthetic.
Required Materials List
- One (1) Plug-In Leather Strap Sconce.
- One (1) Decorative E26 filament-style LED bulb.
- Mounting hardware (screws, anchors, included).
- Phillips screwdriver and drill.
- Pencil and level.
DIY Installation Instructions (Plug-In Sconce)
- Mark the Spot: Determine the desired height for the wall plaque. Use a level and pencil to mark the exact location for the mounting screws.
- Drill and Mount Plate: Drill pilot holes and insert wall anchors if needed. Screw the wooden wall plaque securely to the wall. It must be stable enough to support the light and slight tugs on the cord.
- Assemble and Install Bulb: Screw the decorative LED bulb into the socket hanging from the leather strap.
- Plug In and Manage Cord: Plug the cord into a nearby wall outlet. Ensure the cord hangs neatly or use small, discreet cord clips to run the cord neatly down the wall and along the baseboard to the outlet.
- Test the Light: Turn on the in-line cord switch or wall switch to activate the light.
33. ????️ Architectural Up/Down Wall Washers
Product Name: Recessed Geometric Up/Down Wall Light

This fixture is an elegant bathroom lighting fix focusing on architectural light rather than the fixture itself. The central white square is recessed into the wall, casting beams of warm light both upward and downward within the niche. This creates a vertical rectangle of soft illumination, highlighting the texture of the wall surface beautifully.
This subtle design adds drama and height to a small room by drawing the eye vertically. Because the light source is hidden within the fixture’s recessed frame, it minimizes glare and maintains a clean, minimalist aesthetic. This light works wonderfully as an accent in hallways, near the toilet, or beside the vanity, providing soft ambient lighting without visual clutter.
Required Materials List
- One (1) Up/Down Wall Washer Fixture (Hardwired, damp-rated).
- Non-contact voltage tester.
- Phillips screwdriver, drywall saw, and wire access tools.
- Wire strippers/cutters and electrical tape.
- Stepladder.
DIY Installation Instructions (Recessed Wall Light)
- Safety Disconnect: Turn off the power to the wall circuit at the main breaker. Verify power is off using your tester.
- Cut Wall Opening: Use the fixture’s template to carefully trace and cut a rectangular opening into the drywall large enough to accommodate the fixture and its mounting box.
- Run Wiring: Run house wiring (Black, White, Ground) into the newly cut opening, ready for connection.
- Connect and Mount: Connect the fixture’s wires to the house wires using wire nuts. Secure the fixture’s housing or electrical box inside the wall opening. Some fixtures secure via clips or screws that lock onto the drywall.
- Install Trim: Secure the final decorative trim plate flush over the opening.
- Test the Light: Restore power and confirm the light casts an even wash both above and below the central element.
34. ????️ Frameless Backlit Mirror with Touch Control
Product Name: Rectangular LED Halo Mirror with Demister

This frameless mirror represents a sleek, high-tech bathroom lighting fix. The entire perimeter of the mirror is outlined with a bright LED light strip, creating a “halo” effect. This provides excellent, shadow-free task lighting for the user’s face, essential for grooming. The rounded corners add a softer, contemporary touch.
A small, discreet touch button on the mirror’s surface controls the light, often including features like dimming or color temperature change. Many of these mirrors also include an integrated demister (defogger) pad, which is a major bonus in a steamy, small bathroom. Eliminating the need for separate vanity lights makes the wall look clean and uncluttered.
Required Materials List
- One (1) Hardwired LED Mirror (Damp-rated).
- Mounting bracket/hardware (included).
- Non-contact voltage tester.
- Phillips screwdriver.
- Wire strippers/cutters, wire nuts, and electrical tape.
- Level and measuring tape.
- Two people (recommended for hanging).
DIY Installation Instructions (Hardwired LED Mirror)
- Power Disconnection: Shut off the power to the circuit at the main panel. Use a voltage tester to ensure the power is off at the existing junction box location.
- Mount the Bracket: Secure the mirror’s wall bracket to the wall, making sure it is perfectly level and centered above the sink.
- Connect the Wires: With a partner holding the mirror, pull the house wiring through the access port on the mirror’s back. Connect the mirror’s wires (Black to Black, White to White, Ground to Ground) using wire nuts.
- Hang the Mirror: Carefully lift the mirror and securely engage it onto the wall bracket. Check that it is stable and flush against the wall.
- Final Test: Restore power and use the touch sensor to verify the LED light and demister function correctly.
35. ????️ Smart Home Voice-Controlled Dimmer
Product Name: Voice-Activated Smart Dimmer Switch

While not a fixture itself, upgrading the control is a major bathroom lighting fix that adds incredible convenience and atmosphere. This image highlights a smart dimmer switch that can be controlled via voice commands or an app, providing seamless integration into a modern home. The switch face itself is sleek and minimalist.
Changing your wall switch to a dimmer allows you to control the intensity of any existing or new fixture, instantly changing the mood of your small bathroom from bright task lighting to a soft, relaxing spa glow. The ability to use voice commands is extremely hygienic and convenient when your hands are wet. A single switch upgrade drastically improves the functionality of all your bathroom lights.
Required Materials List
- One (1) Smart Dimmer Switch (Compatible with existing light bulbs).
- Wall plate (included).
- Non-contact voltage tester.
- Phillips and flathead screwdrivers.
- Electrical tape and wire nuts.
DIY Installation Instructions (Replacing a Switch)
- Strict Safety: Turn off the power to the light switch circuit at the main breaker box. Confirm the power is off by testing the existing switch plate screws with your voltage tester.
- Remove Old Switch: Unscrew and pull the existing switch out of the junction box. Disconnect the old wires, noting which wire (often the black/hot wire) was connected to which terminal. Take a picture of the wiring before disconnecting.
- Wire the New Smart Switch: The smart dimmer may require a neutral wire (often white), a ground wire (green/bare copper), and two traveler/line wires (usually black/red). Connect the new smart switch wires to the appropriate house wires using wire nuts, following the new switch’s specific wiring diagram exactly.
- Mount and Cover: Gently push the wires back into the box and screw the new dimmer switch securely into place. Attach the new wall plate cover.
- Configure and Test: Restore power at the breaker. Follow the manufacturer’s instructions to connect the switch to your home Wi-Fi network and voice assistant (like Alexa or Google Home). Test the dimming and voice functions.
36. ???? App-Controlled Color Changing Lights
Product Name: Vanity RGB LED Strip Lighting Kit

This innovative solution is a highly customizable bathroom lighting fix that prioritizes ambiance and fun. It involves mounting a color-changing (RGB) LED strip around the mirror or vanity overhang. Crucially, the light color and brightness are controlled wirelessly via a smartphone app or remote.
The ability to choose any color from the spectrum fundamentally changes the feel of the small bathroom for parties or relaxing soaks. Using blue or cool white provides excellent task lighting, while red or purple creates a spa-like atmosphere. The strips are typically low-profile, disappearing when off, which maintains a clean aesthetic while offering dramatic lighting options.
Required Materials List
- One (1) RGB LED Strip Light Kit (Damp-rated, low-voltage).
- RGB Controller and Wi-Fi Module.
- LED power supply/driver.
- Mounting adhesive or clips (included).
- Non-contact voltage tester.
DIY Installation Instructions (RGB Strip Light Kit)
- Power Preparation: Turn off the main power to the circuit. Locate a power source behind the vanity or mirror where the driver will be hidden.
- Mount the Driver/Controller: Install the LED driver and the RGB controller in a concealed location (like above the medicine cabinet or inside a vanity drawer). Connect the driver’s input wires to the house wiring (Black, White, Ground).
- Prepare and Attach the Strip: Measure and cut the LED strip to frame the mirror or vanity area. Clean the mounting surface thoroughly. Peel the adhesive backing and press the strip firmly into place.
- Connect Low-Voltage: Connect the end of the LED strip to the controller unit using the provided connectors.
- Finalize and Test: Restore power. Download the manufacturer’s app and pair your phone with the controller. Test the color changes, dimming, and programmed scenes.
37. ???? Color Changing Shower Head Light
Product Name: LED Illuminated Rain Shower Head

This unique fixture is a fun, non-permanent bathroom lighting fix that adds a surprising element to the shower experience. The shower head features integrated LED lights that often change color based on water temperature (or are manually controlled). The bright, colorful streams of water create a therapeutic, moody effect.
Installation is incredibly easy, as this device usually screws directly onto the existing shower arm pipe—no electrical wiring needed! It often generates its power from the flow of water itself. This accessory brings a playful and modern update to a small shower without making any major renovation changes, providing an exciting accent to your daily routine.
Required Materials List
- One (1) LED Shower Head (Handheld or fixed).
- Adjustable wrench.
- Plumber’s tape (Teflon tape).
- Damp cloth.
DIY Installation Instructions (Accessory Replacement)
- Turn Off Water: Turn off the water to the shower at the main valve or the tap.
- Remove Old Head: Use the adjustable wrench to carefully unscrew the existing shower head from the shower arm pipe. Use a rag or cloth to protect the finish of the pipe while wrenching.
- Prepare Pipe: Clean the threads on the shower arm pipe. Wrap a small amount of plumber’s tape (Teflon tape) clockwise around the pipe threads. This ensures a watertight seal.
- Install New Head: Hand-screw the new LED shower head onto the pipe threads, turning it clockwise until it is finger-tight. Use the adjustable wrench for a final quarter-turn, being careful not to overtighten and damage the plastic threads.
- Test: Turn the water on and check for leaks. Watch the LED lights activate as the water flows.
38. ????️ Mirror with Integrated Dimmer Knob
Product Name: Square Vanity Mirror with Dimming Control

This mirror offers a highly functional and integrated bathroom lighting fix. The large, square mirror has an LED strip built into its perimeter for shadow-free lighting. A standout feature is the physical control knob, allowing for tactile adjustment of the light intensity and color temperature (warm vs. cool).
This unit combines the practicality of a dimmer switch with the clean look of an illuminated mirror, reducing wall clutter. The physical knob allows you to quickly and intuitively set the light exactly how you need it for applying makeup or shaving. This integrated approach is a fantastic space-saver and a great upgrade for a contemporary small bathroom.
Required Materials List
- One (1) Hardwired LED Mirror with Control Knob (Damp-rated).
- Mounting bracket/hardware (included).
- Non-contact voltage tester.
- Phillips screwdriver.
- Wire strippers/cutters, wire nuts, and electrical tape.
- Two people (recommended for hanging).
DIY Installation Instructions (LED Mirror with Knob)
- Power Disconnection: Switch off the power to the circuit at the main panel. Use the voltage tester to ensure the power is off.
- Mount the Bracket: Secure the mirror’s wall bracket to the wall, making sure it is level and centered above the sink.
- Connect the Wires: With a partner holding the mirror, pull the house wiring through the access port on the mirror’s back. Connect the mirror’s wires (Black to Black, White to White, Ground to Ground) using wire nuts.
- Hang the Mirror: Carefully lift the mirror and securely engage it onto the wall bracket. Check that it is stable and flush against the wall.
- Final Test: Restore power and use the control knob to verify the light turns on, dims, and changes color temperature smoothly.
39. ???? Battery-Powered Motion Sensor Light
Product Name: Wireless Battery-Operated Motion Night Light

This small, easily installed device is an incredibly practical and non-permanent bathroom lighting fix. It is a compact, battery-operated light that features a motion sensor. It illuminates automatically when movement is detected in the dark, providing a soft, immediate light source.
This light is invaluable for night-time visits; it eliminates the need to turn on the harsh main lights, protecting your night vision. Installation is simple because it requires no wiring—you can secure it using screws or strong double-sided tape. This is a budget-friendly and quick fix to improve safety and low-level lighting in any small or windowless bathroom.
Required Materials List
- One (1) Battery-Operated Motion Sensor Light.
- Required batteries (check packaging).
- Mounting screws or strong double-sided adhesive (often included).
- Phillips screwdriver (if mounting with screws).
DIY Installation Instructions (Wireless Light)
- Install Batteries: Open the light housing and insert the required batteries, ensuring correct polarity.
- Choose Location: Identify a low-traffic area on the wall, usually near the baseboard or opposite the door, to capture motion as you enter.
- Mounting:
- Adhesive: Peel the backing off the adhesive strip and press the light firmly onto the clean, dry wall surface for 30 seconds.
- Screws: Mark the screw placement, drill small pilot holes, and secure the mounting plate to the wall. Then, attach the light housing to the mounting plate.
- Test Sensor: Turn off the main lights and step back. Move into the sensor’s range to confirm the light activates automatically.
40. ???? Combined Light, Speaker, and Shower
Product Name: LED Light, Bluetooth Speaker, and Rain Shower Combo

This multi-functional fixture is the ultimate high-tech bathroom lighting fix for modern small spaces. Installed flush on the ceiling, it combines a bright, diffused LED light panel with an integrated Bluetooth speaker and a rain-style shower head. This unit maximizes ceiling space by merging three separate utilities into one clean fixture.
The light provides excellent general ambient illumination for the shower area. The built-in speaker allows you to stream music or podcasts without cluttering counter space with a separate device. This type of fixture creates a spa-like, immersive experience, proving that a small bathroom can still feature state-of-the-art amenities.
Required Materials List
- One (1) LED/Speaker Shower Combo Unit (Wet-rated, hardwired).
- Mounting hardware (included).
- Non-contact voltage tester.
- Phillips screwdriver, wire strippers, and plumber’s tape.
- Stepladder.
- Plumbing knowledge required for connecting the water line.
DIY Installation Instructions (Combo Unit)
- Power and Water Disconnect: Turn off the main power to the ceiling light circuit. Turn off the main water valve to the house or bathroom. Verify power is off with a tester.
- Prepare Ceiling: Remove the old ceiling fixture and shower head. Run both electrical wiring (Black, White, Ground) and the water supply pipe connection to the location where the combo unit will be mounted.
- Wire Connection: Connect the unit’s electrical wires to the house wiring using wire nuts.
- Water Connection: Connect the unit’s water inlet to the shower arm pipe, often done before mounting the unit to the ceiling. Use plumber’s tape on the threads to ensure a leak-proof connection.
- Mount the Unit: Secure the large, flat unit to the ceiling, ensuring both the electrical and water connections are protected within the ceiling cavity.
- Test: Restore water and electrical power. Test the shower function for leaks, and pair your phone via Bluetooth to confirm the speaker works.
41. ???? Color Temperature Changing Flush Mount
Product Name: Low Profile Square LED Flush Mount with Color Control

This sleek, modern fixture provides a versatile and effective bathroom lighting fix, especially for low-ceiling small spaces. The light is a thin, square panel mounted flush against the ceiling, ensuring it doesn’t drop down or visually clutter the room. The image demonstrates its main benefit: the ability to switch between standard white light (for task) and vibrant colors (like blue or magenta for ambiance).
Using a flat, square fixture like this provides broad, uniform illumination that prevents dark corners. The color-changing option, often controlled via a remote or wall switch, allows you to shift the entire mood of the room instantly. This light is an excellent choice for a master bath or a powder room where both functionality and the ability to set a relaxing mood are important.
Required Materials List
- One (1) Color-Changing LED Flush Mount Fixture (Damp-rated).
- Mounting bracket and screws (included).
- Remote control or wall switch (included).
- Non-contact voltage tester.
- Phillips screwdriver.
- Wire strippers/cutters and electrical tape.
- Stepladder.
- Safety glasses and work gloves.
DIY Installation Instructions (Color-Changing Flush Mount)
- Crucial Safety Step: Turn off the main power to the circuit at the breaker panel. Use a non-contact voltage tester to confirm that the electricity is completely disconnected at the ceiling junction box.
- Remove the Existing Light: If replacing an old fixture, unscrew and detach it, disconnecting the three wires (Black, White, Ground).
- Install the Mounting Bracket: Secure the new light panel’s mounting bracket to the ceiling junction box using the provided screws.
- Connect the Wiring: Hold the new fixture close to the ceiling. Connect the fixture’s wires to the house wires: Black to Black, White to White, Ground to Ground. Secure these connections tightly with wire nuts.
- Secure the Fixture: Gently push the connected wires into the junction box. Align the flat panel light with the mounting bracket and secure it using the locking mechanism (often turn-locks or small final screws) to ensure it sits flush against the ceiling.
- Test the Light: Restore power. Use the remote control or wall switch to test the white light setting, and then cycle through the various color options to confirm the fixture’s full functionality.
You now have 41 stunning strategies at your disposal to transform even the smallest, most boring bathroom. We have explored everything from the sleek lines of vertical LED wands to the dramatic effect of backlit stone, proving that light fixtures are far more than just functional necessities. They are powerful design tools.
By layering your light—combining task lighting at the vanity with ambient lighting from the ceiling and adding accent lighting at the floor or in the shower—you can eliminate shadows and give the illusion of depth. Choosing fixtures that integrate light directly into mirrors or cabinets is the single best trick for maintaining a clean, clutter-free look.
Do not let your compact space dictate your style any longer. Take these comprehensive bathroom lighting fixes and upgrade your bathroom from dull to dazzling. Your perfect, brightly lit retreat awaits.
✨ Key Takeaways
- Layering is Key: To maximize brightness and minimize shadows, always combine overhead (ambient), vanity-side (task), and low-level (accent) lighting.
- Embrace Verticals: Choose vertical sconces or linear lights instead of wide horizontal bars. Vertical lines draw the eye up, visually increasing the ceiling height.
- Minimize Clutter: Opt for integrated lighting solutions, such as illuminated mirrors and LED medicine cabinets. These eliminate the need for bulky wall fixtures.
- Focus on Ambiance: Use dimmers, warm-toned bulbs, or color-changing systems. This allows you to quickly shift the room from bright task mode to a soft, relaxing spa environment.
- Use Diffused Light: Choose frosted glass, shades, or perimeter-lit mirrors. Diffused light is flattering to the face and prevents harsh glare in a small space.